Cards Against Isolation (Authentication)
As someone who spends most of their time in the backend, I’ve become used to seeing green dots in my test suite as an indication of progress but there is something quite satisfying about writing code and seeing something change on screen. After 3 posts of planning and setup, it seems like a good time to fill that desire to be able to point to something you’ve done.
There are few dependencies to be installed and then we will take a test-driven approach. This means it won’t be until the end of this post that you see something in the browser but you’re going to feel so good when you’ve created something that doesn’t just work but even checks itself for errors.
Your terminal should still be at the root level of your project. If you’re
following along in multiple sessions, you’ll want to make sure you always set
your terminal directory when you get started or when you open a new terminal
window/tab. I previously mentioned that I keep my code in a dev folder and I
called the project cards_against_isolation so the command I run is:
cd ~/dev/cards_against_isolation
To be able to see our site, we need to run the Rails server:
rails s
Sometimes Rails will tell you:
======================================== Your Yarn packages are out of date! Please run
yarn install --check-filesto update. ========================================
If so, just run:
yarn install --check-files
and then try booting the server again.
It’s ready to go when you see:
* Listening on tcp://127.0.0.1:3000
You can now open your browser to http://localhost:3000
The next issue is shown in your browser
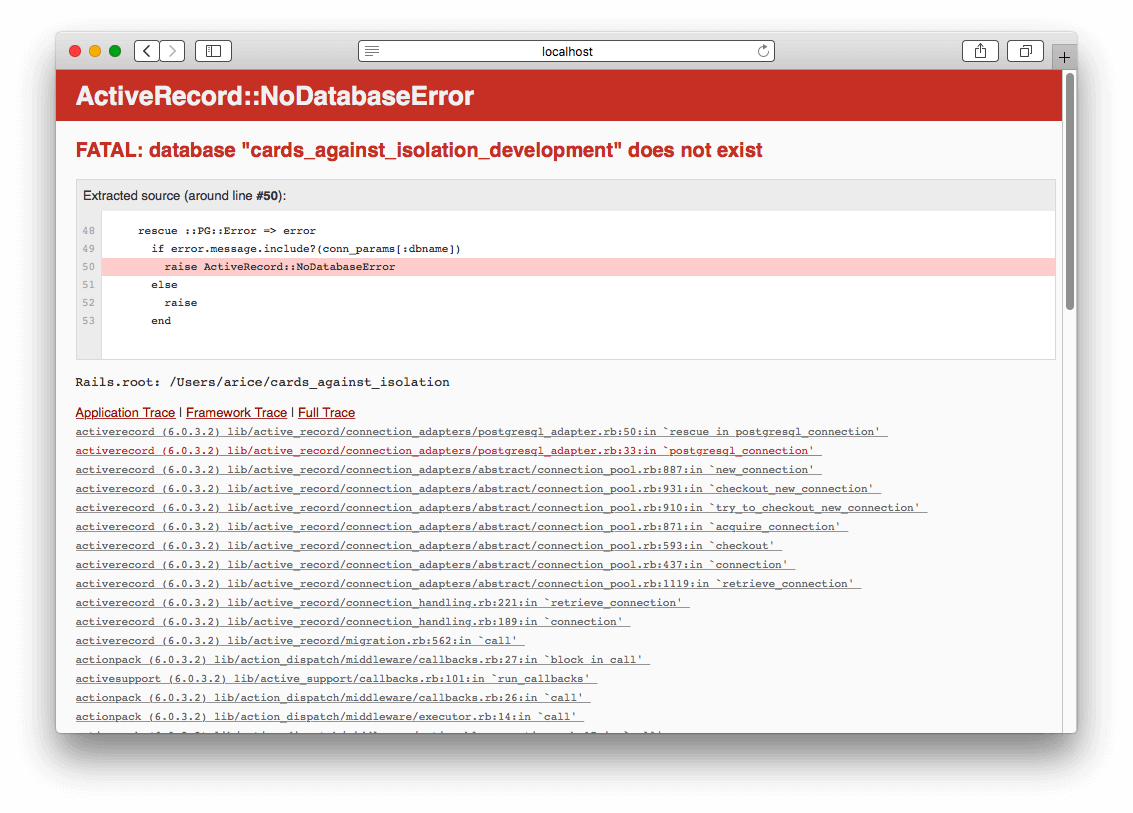
While we installed PostgreSQL (or MySQL) and told Rails that we want to use it,
we never actually created the database. The default database configuration that
Rails provides should be perfectly acceptable for development. If you take a
look at config/database.yml in your editor, you’ll see:
development:
  <<: *default
  database: cards_against_isolation_development
...
test:
  <<: *default
  database: cards_against_isolation_test
As you might suspect, the development database is what you will be directly working with while the test database is exclusively for your test suite to use. There isn’t really much to your local configuration. It is automatically assumed that your database is on your computer (localhost), it is running on its standard port number, and the user is whatever user you log into your computer with (arice for me).
Back in your terminal, stop the Rails server by pressing control-c and then run:
rails db:setup
This creates both the development and test database. We haven’t created any
tables in our database yet but, if this was an existing project that had tables,
db:setup would also create the tables and columns in the database. Some
projects are unusable without pre-defined data which you can put into
db/seeds.rb and that will be run to populate the database.
Now, boot the server again:
rails s
SUCCESS!

We won’t be using the browser for a little bit so stop the Rails server with control-c.
Dependencies#
So, that Rails landing page is pretty and all but it isn’t really what we are looking for.
To show our own content, we’re going to need to create a controller and a view (the elements specific to the page). Before we do this, it’s important to understand how Devise will fit in.
If you want to have multiple pages for people who are not logged in, you could create controllers for those pages and exclude them from requiring authentication. I’d rather keep this site simple, however, and there will be a landing page with some basic information on it and a login form with a link to register. Since login and registration is handled by Devise, we don’t actually need a controller for those. Instead, we can create a controller for what people will see when they are logged in, tell Rails to land people on that controller, and tell Devise that people are not allowed to access the controller unless they are logged in. Devise will automatically take people to a login page if they are not logged in.
We need to install a few things, including Devise, before we can progress.
Previously I skimmed over how Ruby dependencies are installed and now is a good
time to have that discussion. While gems can be installed via the gem
command—and this was necessary for creating our project—you will normally use
Bundler to manage your dependences. Bundler reads a file called Gemfile in your
project to work out what gems need to be installed to run your project. Despite
not including the “.rb” extension, Gemfile is actually just a Ruby file. There
has been a lot of debate about changing the name to Gemfile.rb but it has
remained due to the confusion that would be caused if it changed after all these
years.
If you open Gemfile in your editor, you will see many lines that begin with
the word “gem” followed by a name like “rails” and then one or two version
numbers.
The first version number is the minimum version you will allow and the second applies a limit to those versions. It’s going to be easier to explain that with examples.
Let’s start with an easy one:
gem 'pg', '>= 0.18', '< 2.0'
Here we require the pg (or PostgreSQL) gem with a version of at least 0.18 but less than 2.0.
gem 'puma', '~> 4.1'
This is a “pessimistic version constraint”; it says that we want at least version 4.1 of Puma but less than version 5. The rule is that the numbers to the left of the last demical place cannot change. Since the version provided here is 4.1, the .1 can change but the 4 must remain. In other words “less than version 5.0”.
On the other hand, the Rails requirement has 2 decimal places:
gem 'rails', '~> 6.0.3', '>= 6.0.3.2'
Left of the last decimal place is 6.0 so it says we need version 6.0.3 or greater but less than 6.1. The limiter, however, says that the version must be at least 6.0.3.2. By combining the 2 numbers, we are telling Bundler that we need a version of Rails at least 6.0.3.2 but less than 6.1.
The pessimistic version constraint syntax (~> x.x) is called a
“twiddle wakka”. You might think that’s a terribly unfortunate name. I was also
once like you until I found out it was
originally called “spermy”.
There is no way to force gem maintainers to use sensible version numbers, however, there is a tendency to use semver which, as a consumer, can be thought of as major.minor.patch or breaking.feature.fix (BFF). Rails takes this a step further with a fourth number for security patches. This means that, when we lock Rails to at least 6.0.3.2 but less than 6.1, we can feel safe that we are allowing security and bug fixes to be installed but no breaking changes. If you were to update your gems, you could be comfortable that you would still be compatible with this tutorial even though the version numbers didn’t exactly match.
If a dependency is inside a group block, it will only be installed in those
environments otherwise it will be installed in all environments. For example,
Rails is not inside a group so it will be installed in development, test, and
production. On the other hand, byebug is written as:
group :development, :test do
  # Call 'byebug' anywhere in the code to stop execution and get a debugger console
  gem 'byebug', platforms: [:mri, :mingw, :x64_mingw]
end
which means it will only be installed in development and test but not in
production. The platforms section tells you that this gem doesn’t work in all
flavours of Ruby. There isn’t just 1 kind of Ruby. The “main” type that we are
using is called MRI (Matz’s Ruby Interpreter) aka CRuby. You can, however, take
the Ruby specification and use it to make your own implementation, for which
there are many. For example, JRuby uses the same syntax as MRI but it is run on
the Java Virtual Machine which allows Ruby code to be packaged into a Java
application or for a Ruby application to call Java libraries.
Rubocop#
First up, I’d like to use Rubocop to ensure I’m writing consistent code. Rubocop will read your code and match it against a style guide to ensure there are no violations. It’s completely optional if you want to take this step. Consistently written code is easier to read and will help you to focus on what the code means instead of what it says. Saying this, if you already have opinions on how you like to write your code, it might just be an annoyance to have my opinions thrust upon you. If you are skipping this step, you can jump down to Testing tools.
You would never do style guide checks in test or production so Rubocop gets
installed in the development group. We’ll use the twiddle wakka to stay within
the 1.x versions. I also like to add rubocop-performance which gives tips
about how to re-write your code for better performance, rubocop-rails which
knows about Rails specific styles, and rubocop-rspec for styles related to the
testing framework. We haven’t added RSpec yet but we may as well get all the
Rubocop stuff out of the way now.
I find it easier to quickly scan my gem list when they are in alphabetical order so I have:
group :development do
  gem 'listen', '~> 3.2'
  gem 'rubocop', '~> 1.2', require: false
  gem 'rubocop-performance', require: false
  gem 'rubocop-rails', require: false
  gem 'rubocop-rspec', require: false
  # Spring speeds up development by keeping your application running in the background. Read more: https://github.com/rails/spring
  gem 'spring'
  gem 'spring-watcher-listen', '~> 2.0.0'
  # Access an interactive console on exception pages or by calling 'console' anywhere in the code.
  gem 'web-console', '>= 3.3.0'
end
Once you’ve saved the Gemfile, the dependencies will need to be installed. To do that, run:
bundle
There are a lot of things I don’t like about the default style guide. In
particular, I find it too dogmatic in places and either forces you to change
perfectly lovely code to suit the guide or you litter your code with comments
that temporarily disable Rubocop. The reasons for each of my decisions are far
too long for this post but hopefully I’ll write a post about it one day. For
now, I recommend you simply
copy the contents of my configuration
into a file called .rubocop.yml. It’s important to note that the dot in-front
of the filename means that the file is hidden; you can see it in your editor but
you won’t see it in the Finder. Most likely, it will be easiest for you to
create the .rubocop.yml in your editor and copy and paste the contents from my
config.
To get Rubocop to check your code, you run:
rubocop
For me, this returned 86 offenses because some of my choices differ from those of the Rails team. Thankfully, Rubocop can automatically fix the offenses for you. It is possible to ask to just fix everything it can but I prefer to tackle each of the types of issue one at a time and think about what it’s doing. There are some types of issues that Rubocop does a poor job of fixing and I like to sanity check it.
48 of the 86 were because I prefer double quotes to single quotes. Double quotes allow string interpolation whereas single quotes do not, such as:
name = "Adam"

puts 'Hello, my name is #{name}'
# Hello my name is #{name}

puts "Hello, my name is #{name}"
# Hello my name is Adam
There is no noticable performance difference between using single and double quotes and so I’d rather use just one type.
You’ll notice the offenses for quotes say “Style/StringLiterals”. This is the name of the rule that is being violated and we can use it to tell Rubocop which offenses to correct:
rubocop --only Style/StringLiterals -a
The -a means “auto-correct”. There is a more expressive option,
--auto-correct, but I find that a lot to type regularly.
I don’t believe I’ve ever seen Rubocop fail at changing single quotes to double
quotes but you should get into a habit of reviewing all your changes before you
add them to git. Previously we were adding everything to git with git add ..
This is fine in those initial commits where all the code is coming from an
installer but you should always review your own changes. You can do this with:
git add --patch
The only catch is that the patch flag only works with “tracked” files, not new
files. When you run git status, untracked files will be shown at the bottom.
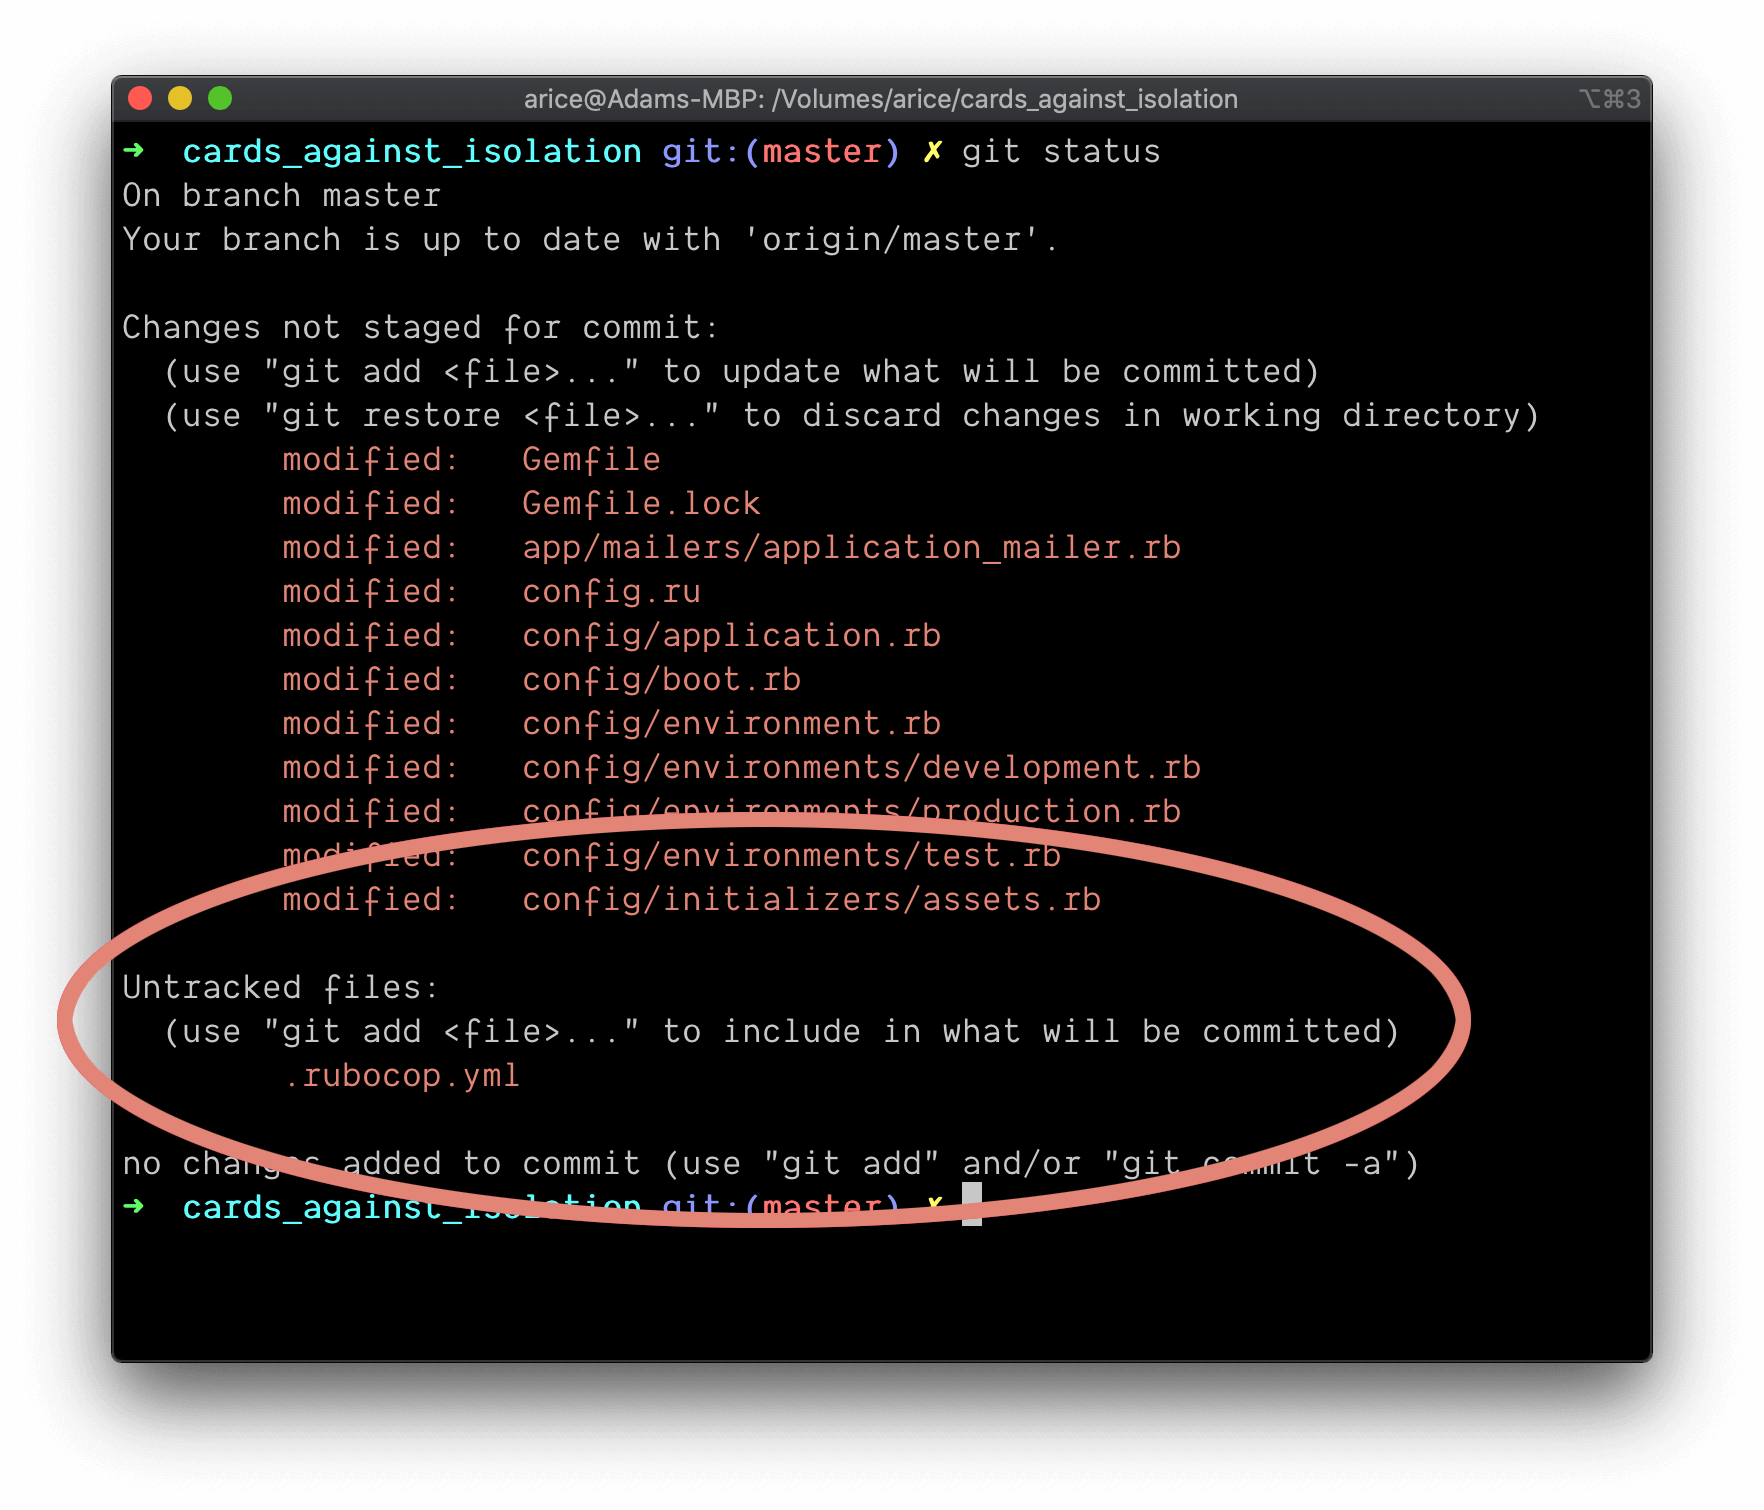
To prepare untracked files for review, you add them with the --intent-to-add
flag. Since it is just the Rubocop config we need to add we call:
git add --intent-to-add .rubocop.yml
Now you can run through the changes with:
git add --patch
You will be shown each change within each file and you will be asked whether or not to “stage this hunk”. Something something hunk joke here.
The important responses to know are:
y: yes, stage this hunk;n: no, do not staging this hunk;a: stage not just this hunk but all later hunks in this file; andd: do not stage this hunk or any later hunk in this file.
If you forget, you can always respond with a question mark for instructions and exit with control-c (this is a super-common exit command).
While I always review my changes to Gemfile, I tend to use a for files like
Gemfile.lock unless I know there is something I need to check. It is rarely
going to be valuable to check that Bundler or Rails did what you asked; they are
heavily tested and you can rely on them. Just make sure you asked them to do the
right thing; it is you who is unreliable.
Now that the files are staged, I’m not going to commit just yet just because I don’t want a stack of commits that just say “👮♀️”. Staging the files before correcting the next round of offenses just makes reviewing the changes a little easier since they are coming in smaller batches.
I’m now down to 38 offenses and 28 of those are “Style/FrozenStringLiteralComment”. When you start a Ruby file with the comment:
# frozen_string_literal: true
all of your strings become immutable (or unable to be changed) by default. This may sound like a disadvantage but it allows Ruby to optimise memory. If you create the same string multiple times, even across multiple files, Ruby will only ever create that string once and subsequent uses will point to the original one.
Apparently Rubocop 0.87 introduced a breaking change that means that some cops,
including Style/FrozenStringLiteralComment, can no longer be automatically
corrected with the standard option, -a. They believe that this is an “unsafe”
operation and so you must pass -A instead. Of course, we are diligent coders
who check every change before we commit so we will know if anything bad happens.
rubocop --only Style/FrozenStringLiteralComment -A
Now, look, Rubocop isn’t the smartest tool. The frozen string literal change is what’s known as a “magic comment”. There is a rule that says that there must be an empty line after magic comments but, when auto-correcting, it doesn’t add that line so we need to fix that before we stage. 🤷♂️
rubocop --only Layout/EmptyLineAfterMagicComment -a
git add --patch
Okay, I’m down to 12 offenses… which is amazing because 38 - 28 = 10. Because this post is going down a serious Yak Shaving rabbit hole, we’re just going to tell Rubocop to fix those:
rubocop -A
git add --patch
Unfortunately, Rubocop can’t automatically fix everything so you’ll need to make
the last change yourself. Open config/environments/development.rb in your
editor and change line 19 from:
if Rails.root.join("tmp", "caching-dev.txt").exist?
to:
if Rails.root.join("tmp/caching-dev.txt").exist?
Once again, stage your change, check to make sure Rubocop is happy now, and then it’s time to commit:
git add --patch
rubocop
git commit
I’m using the commit message
Install Rubocop and correct all offences
Testing tools#
As we build this game, we are going to be testing all the important logic and components. While it feels like there are a million different types of tests, we are only going to focus on two types:
- unit (testing the smallest chunks of backend code); and
- feature aka system (automating interations in a browser to test everything from elements in the interface, to how the various components of the backend come together to react to an event, and how the page changes based upon messages from the server).
For many years now, my work has focused heavily on mobile apps in front of API-only backends. This means I haven’t actually done a lot of feature testing and so we’re going be learning that together. Most likely, our tests won’t be perfect, but we’ll only build that skill with practice. The problem with having only unit tests alone is that you know that part A, B, and C work in isolation, but you don’t know what happens when the 3 have to work together. Worse still, unit tests inevitably make a lot of assumptions about what data will be received and it’s common that reality swoops in to smack you in the face. Even if it turns out our feature tests could be better, just knowing that there is a test that checks that putting the pieces together works is a huge weight off our shoulders.
As mentioned in the introduction, my testing framework of choice is RSpec. It gets installed in the Gemfile in both the development and test environments. This might seem odd since the testing framework is only needed when you are testing but it just allows you to use the RSpec commands without explicitly setting the environment. Think:
rspec
Instead of:
RAILS_ENV=test rspec
Your Gemfile should look like this (there is a Rails specific gem for RSpec):
group :development, :test do
  # Call 'byebug' anywhere in the code to stop execution and get a debugger console
  gem "byebug", platforms: %i[mri mingw x64_mingw]
  gem "rspec-rails", "~> 4.0.1"
end
Then install it and run its installer:
bundle
rails generate rspec:install
This will create a spec directory, which is where all your tests go, and a
couple of configuration files. Those files won’t match our style guide so send
in the cop:
rubocop -A
Just be aware that Rubocop will be unable to fix 1 offense but you don’t need to worry about that, it’ll be gone soon.
Given how much Rails does, it’s a heavy framework and it will add a few seconds to your test boot time. RSpec defaults to not booting Rails so that, if you have tests that won’t need Rails, you don’t need to pay the boot penalty. Not only will our tests rely on Rails but this isn’t the time to be digging into that level of optimisation so we’re going to tell RSpec to always boot Rails.
One of the files created by the installer was .rspec which will contain:
--require spec_helper
Change this to:
--require rails_helper
If everything is set up correctly, if you run:
rspec
you will be told:
0 examples, 0 failures
That is all we need to do for now to have unit tests but there is a little more setup for feature tests.
When you are testing your frontend, you need to do things like programmatically find elements on the page using attributes like IDs, class names, etc. Keeping track of all these can get to be a bit painful but SitePrism helps brings structure and integrates nicely with RSpec.
Most Ruby feature tests are going to be using Capybara under the hood. Capybara not only provides the methods you use to interact with the page but it also passes your messages to the “driver”. It is most common to use the Selenium driver to test in a browser but this requires you to install a browser driver and keep that up-to-date which I’ve found to be an annoying pain in the arse. Instead, we’re going to use Cuprite which is a headless Chrome driver. “Headless” just means you don’t actually see the browser. Normally, Selenium would actually open your browser and automate actions which you can see happening. While Cuprite is still running in the Chrome browser, it isn’t wasting resources by drawing to the page. Since it uses Chrome, you are going to need to have it installed (although doesn’t everyone have Chrome installed‽). You don’t need to add Capybara as a dependency since SitePrism already depends upon it and will have its own ideas about what versions it is happy with.
Both dependecies are only needed in the test environment so add them in a new
group after the development group and then run bundle:
group :test do
  gem "cuprite", "~> 0.11.0"
  gem "site_prism", "~> 3.7.0"
end
Now we need to require these at the top of spec/spec_helper.rb and then add
some configuration. I read the long comment that RSpec left in the spec_helper
and then deleted it leaving me with:
# frozen_string_literal: true

require "capybara"
require "capybara/cuprite"
require "capybara/rspec"
require "site_prism"
require "site_prism/all_there"

Capybara.server = :puma

Capybara.register_driver :site_prism do |app|
  Capybara::Cuprite::Driver.new(app, window_size: [1200, 800])
end

Capybara.javascript_driver = :site_prism

RSpec.configure do |config|
...
Our test suite is now ready to go so let’s make another commit. You’ll need to
start tracking the new files so run git status to see a list of the untracked
files and then run git add --intent-to-add [file_path] for each untracked
file. You can include multiple files in one command like:
rubocop
git add --intent-to-add .rspec spec
git add --patch
git commit
Add and configure test suite (RSpec, SitePrism, Cuprite)
Hopefully you noticed that telling git we want to add spec included both files
in this directory. If you have a lot of files to add, you can add the whole
directory and everything will be included. Since we are using the --patch
option, you still need to review each file so there is an opportunity to reject
a file if you included it by mistake in a bulk add.
Devise#
We are clearly going to need Devise in all environments so it will not be in a group. You can place it anywhere in the file, but I find it easiest to put my global dependencies above the grouped ones. To make it easier for you to tell which gems came with Rails and which ones you have added, let’s add a space after “bootsnap” and before the “:development, :test” group and place it there:
gem "bootsnap", ">= 1.4.2", require: false

gem "devise", "~> 4.7.2"

group :development, :test do
Then install the dependencies:
bundle
Devise has some configuration files that will need to be installed with:
rails generate devise:install
config/initializers/devise.rb has the settings including the email address to
send notifications from. We are going to need to change this before deployment
but, right now, I haven’t even thought about the production email address. I’ve
written myself a note to edit this later so don’t be surprised when you
eventually see it in a later post.
config/locales/devise.en.yml is a localisation, or language, file. If you want
to change any of the messages that Devise displays, you simply change this file.
After running the installer, you would have been told:
Ensure you have defined default url options in your environments files
While we haven’t even thought about the production URL yet, we can certainly set
the development and test settings and leave another note to come back to the
production URL. Open config/environments/development.rb, find the existing
Action Mailer settings, and add the example that was provided (but maybe with
double quotes):
  # Don't care if the mailer can't send.
  config.action_mailer.raise_delivery_errors = false

  config.action_mailer.perform_caching = false

  config.action_mailer.default_url_options = { host: "localhost", port: 3000 }
Then do the same thing in config/environments/test.rb:
# Disable request forgery protection in test environment.
config.action_controller.allow_forgery_protection = false

config.action_mailer.perform_caching = false

config.action_mailer.default_url_options = { host: "localhost", port: 3000 }
Unless you do this, Action Mailer doesn’t know what the URL for your website is and, when Devise sends emails for things like confirming an email address exists or forgetting a password, it needs to include a link to your site.
To see Devise error messages, we need to show “flash messages” in our templates. After installing Devise, it would have told you:
Ensure you have flash messages in app/views/layouts/application.html.erb.
For example:

  <p class="notice"><%= notice %></p>
  <p class="alert"><%= alert %></p>
While we should add the flash messages, the code offered by Devise will always
include 2 paragraphs on the page, regardless of whether there is a message to
show. Instead, we should only show the paragraph when there is a message. Open
app/views/layouts/application.html.erb and prepend the flash messages to the
<body> tag:
<body>
  <% if notice %>
    <p class="notice"><%= notice %></p>
  <% end %>
  <% if alert %>
    <p class="alert"><%= alert %></p>
  <% end %>

  <%= yield %>
</body>
It’s unlikely we will want them like that long term but, for now, we just need to know that we’ll see any errors.
This would be a good time to commit but, first, make sure the cop is happy:
rubocop
You should get a couple of offenses that the Devise installer has left us that you’ll need to clean up.
rubocop -a
git status
git add --intent-to-add [paste the untracked files/directories here]
git add --patch
git commit
Message:
Install Devise and configure Action Mailer for development
Player model#
If players are going to log in, that means we need some way to store players; for this we need a model. In general, a model is just a representation of structured data but, within this context, I’m specifically referring to a class that allows you to read, store, and validate data in the database.
The actual communication with the database is handled by Rails via the Active Record module and so your models can be quite small and focus entirely on the logic important to what you’re trying to achieve.
Because we want to use this model for authentication, we will use the Devise helper command:
rails generate devise Player
It’s most common to refer to people as “users” but, in an app like this, it can be valuable to be more specific and think of them as humans rather than as a metric. One place this name will be valuable is when we come to consider the relationship between a game and people playing the game. A game certainly could have users but when have you ever sat around a board and proclaimed “welcome, fellow users”? (I don’t know… given the target audience of this, maybe you have done that)
You should have 3 new files in your project: a database migration, a model, and a spec (test file). Of course, the installer will not have inserted the frozen string literals so:
rubocop -A
The database migration gives Active Record instructions on how to create the
table in the database that will be used for recording the players. If you create
a migration that causes you problems, Active Record makes it easy to roll back
to a previous state while you correct the issues and then step forward again
when you are ready. Migration files are timestamped so the name of yours will
be different to mine but open the file that looks something like
db/migrate/[year][month][day][time]_devise_create_players.rb. As a super-basic
deterrent for spam bots, we’ll get people to confirm their email address. This
requires a couple of extra columns so uncomment (remove the preceding hashes
from) the following lines:
t.string   :confirmation_token
t.datetime :confirmed_at
t.datetime :confirmation_sent_at
...
add_index :players, :confirmation_token,   unique: true
You’ll get a bit of an idea of the power available in Devise from some of the other commented features.
Now we need to tell Rails to run the migration file:
rails db:migrate
You might notice that you now have a new file, db/schema.rb. This is a
representation of the state of your database. When you import an existing
project, Rails can use this file to setup the database instead of running each
of the migrations. If you want to quickly see what columns you have in a table,
this is a great place to look; just keep in mind that database tables get the
pluralised name of the model so the table for Player is players. I’m also a
fan of using the Annotate gem to
add a comment to the end of my models listing the database columns and indicies,
but we are not going into that here.
While we made those confirmation columns in the database, we haven’t actually
told Devise that we want our players to confirm they are real people. To do that
you crack open the model file app/models/player.rb. In there you’ll see Devise
has left some modules commented out. Move :confirmable from the comment and
into the list of options sent to Devise like:
# Include default devise modules. Others available are:
# :lockable, :timeoutable, :trackable and :omniauthable
devise :confirmable, :database_authenticatable, :registerable,
       :recoverable, :rememberable, :validatable
The generator created a model test which we are not currently using. To be
honest, we’ll probably never use it because I strongly believe that there
shouldn’t be any real logic in a model. You should just delete the whole models
spec directory (spec/models) which includes the player_spec.rb file.
Aaaannnnndddd another commit. That schema file is not a particularly fun read and we can trust Rails to keep it updated so let’s just add it.
rubocop
git add db/schema.rb
git status
git add --intent-to-add [paste the untracked files/directories here]
git add --patch
git commit
Create Player as a Devise/authenticable model
Authentication feature spec#
Throughout this build, we’re going to do our best to embrace the Test Driven Development mindset. While it can be tough at times, the most important thing about TDD is not writing perfect tests upfront but thinking about what you are trying to achieve. TDD forces you to plan and it will also drive you to write better code. Highly testable code tends to be created in smaller, focused packages that do one thing well rather than everything in spaghetti.
When testing authentication, most of the heavy lifting is done by Devise and we can trust that it knows what it’s doing. Since we know Rails knows how to load pages and we know Devise knows how to authenticate, the only thing left to test is whether we connected all the pieces correctly. For this, we’ll use a feature test (or spec in the RSpec world).
We added SitePrism to help us keep our feature specs tidy. It lets you create
classes for each of your pages or reusable components that you can call from
inside your tests. There is no enforced convention (or even a suggestion) for
where these classes are stored so we’re going to make place for them. Inside
your spec directory, create a new directory called pages.
When a Ruby file needs to read or interact with another Ruby file, that other file needs to be required. Rails, however, has a really handy loader that does this automatically for us and it’s easy to forget it’s even a thing that needs to happen. Unfortunately, our test suite doesn’t work quite the same way and it won’t know to go looking for our page classes in this new folder. We could add a require line at the top of every file that needs to use one of these SitePrism classes. This is actually the RSpec recommended method because it ensures that, when you run only one test file, the boot time is as fast as possible. This app is not going to be big enough to have performance concerns and I’d rather this was just done for us so we’re going to pre-load all of our classes.
The spec/rails_helper.rb file already has some code commented out for
pre-loading support files. Let’s borrow that example and edit the file so it
reads:
# Dir[Rails.root.join('spec', 'support', '**', '*.rb')].sort.each { |f| require f }

Dir[Rails.root.join("spec/pages/**/*.rb")].sort.each { |f| require f }

# Checks for pending migrations and applies them before tests are run.
Our feature tests get placed in spec/features so you will need to create that
directory. Because features is one of the directories RSpec checks for tests,
you don’t need to require is like the pages directory, RSpec will handle this.
Next, create and open the file spec/features/player_authentication_spec.rb.
We’ll start with a simple test to ensure that unauthenticated players can’t get to our protected pages. The way authentication will work is that we will specify a landing (or root) page that Rails directs people to but that page (via the controller) will be protected by Devise. When Devise sees that the person isn’t authenticated, it will redirect to the sign-in page. This means that we need to consider what that protected page will be and create at least a skeleton for it.
After logging in, players are going to want to see, join, and create games—this page could be called a dashboard. So, let’s create some tests on this basis.
The convention is that controller names are pluralised, so we know we are going to end up with a DashboardsController. We also know that each page we test is going to need its own SitePrism class so it seems to make sense to follow the controller convention and create “dashboards” page classes. Inside our controllers, we are going to be using action titles such as “index”, “show”, “new”, and “edit” so I figure those make for good class names.
Given all this, the test file looks like this:
# frozen_string_literal: true

describe "Player authentication", type: :feature do
  context "when the player is not authenticated" do
    it "sends them to the sign-in page" do
      dashboard = Pages::Dashboards::Show.new
      sign_in_page = Pages::Players::SignIn.new

      dashboard.load
      expect(sign_in_page).to be_displayed
    end
  end
end
Let’s break that down. As you might guess, describe is the description of the
feature we are testing. This is any meaningful statement that explains the
overarching concept. A context explains the situation, or group of situations,
you are testing. Finally, the it statement describes what is being tested and
wraps the actual test. You want these to tell a story about the behaviour that
is occurring. In theory, anyone should be able to understand your story—even a
non-developer—and put themselves into the mindset of the journey.
Now we get into the juicy bits.
dashboard = Pages::Dashboards::Show.new
At this point, this is essentially made up based on the assumptions made above.
That class doesn’t exist, it’s just an idea for how I think this is going to
work; we’re planning. I do know from reading the SitePrism docs, however, that
whatever class I create will need a new instance which I can then call load on
to trigger Capybara to load the page:
dashboard.load
Once the page has been loaded, we can inspect it to see if it did what we wanted. In this case, we want to know that it didn’t go to the dashboard but, instead, the player sign-in page:
expect(sign_in_page).to be_displayed
The player sign-in page class also doesn’t exist yet but I know I want to test that the sign-in page is being shown so it seems logical that I need a concept of a sign-in page.
sign_in_page = Pages::Players::SignIn.new
Now, we know our tests can’t work since we have multiple files we haven’t created yet but, as part of the TDD process, you:
- create your test
- run the test to prove it fails
- fix only the error that was shown
- repeat from step 2 until you see green
So, let’s run the test suite:
rspec
The first error should be:
Failure/Error: dashboard = Pages::Dashboards::Show.new

NameError:
  uninitialized constant Pages
No surprise, this is because we haven’t created the Pages::Dashboards::Show
class so let’s do that. Create a new directory, spec/pages/dashboards, and
then create and open spec/pages/dashboards/show.rb. Remembering that we only
ever fix one error at a time, we want to write as little code as possible.
As with every file, the first line will be:
# frozen_string_literal: true
Each one of those directories we created becomes a “namespace”. This both ensures that our class names don’t clash (there will surely be an index in other parts of the app) and that it’s easy for us to quickly tell what type of file this is:
module Pages
  module Dashboards
Now for the class name. Since SitePrism is doing most of the work, we want our
class to extend the SitePrism::Page class. This gives our class access to the
methods that SitePrism offers for simplifying our testing.
    class Show < SitePrism::Page
    end
  end
end
That’s it, time to run the test again. The next error is:
Failure/Error: sign_in_page = Pages::Players::SignIn.new

NameError:
  uninitialized constant Pages::Players
Create a new directory, spec/pages/players, and then create and open
spec/pages/players/sign_in.rb.
# frozen_string_literal: true

module Pages
  module Players
    class SignIn < SitePrism::Page
    end
  end
end
Now, running the test will show:
Failure/Error: dashboard.load

SitePrism::NoUrlForPageError:
  SitePrism::NoUrlForPageError
We need to tell SitePrism what URL to navigate to. Since we want the dashboard to be the root (or landing) page, it’s URL will simply be “/”.
The SitePrism method for setting the path is set_url so our class now looks
like this:
# frozen_string_literal: true

module Pages
  module Dashboards
    class Show < SitePrism::Page
      set_url "/"
    end
  end
end
After another run of the test we get:
Failure/Error: dashboard.load

ActionController::RoutingError:
  No route matches [GET] "/"
While we decided that we want a dashboard, we haven’t actually told Rails. For a URL to work, we need to add a record into the Rails routes file. The router checks the page request, works out which controller is responsible, and passes on the request.
Edit your config/routes.rb file to read:
# frozen_string_literal: true

Rails.application.routes.draw do
  devise_for :players
  # For details on the DSL available within this file, see https://guides.rubyonrails.org/routing.html

  root to: "dashboards#show"
end
The only new line here is:
root to: "dashboards#show"
which tells Rails that requests to your index page (i.e. https://example.com/)
should be forwarded to the show action of the DashboardsController.
Okay, run your test suite again:
rspec
and then you’ll get:
Failure/Error: dashboard.load

ActionController::RoutingError:
  uninitialized constant DashboardsController
We told Rails to send requests to the DashboardsController but we haven’t
created it yet. Controllers are kind of like the concierges of your app. When
someone loads the dashboard page, the router says “oh, if you go and speak to
the DashboardsController, they’ll look after your request”. The controller
shouldn’t ever do any of the serious work, it just coordinates all the services
needed to fulfil the request and hands your guest the final, delightful package.
Create a new file, app/controllers/dashboards_controller.rb and populate it
with:
# frozen_string_literal: true

class DashboardsController < ApplicationController
end
You’ll see ApplicationController in your controllers directory already. This
is a place for you to add rules or defaults to be used across your whole site.
ApplicationController then extends ActionController::Base which is where
the Rails magic happens; ActionController does a lot of work so that we don’t
have to.
Run your test suite again.
Failure/Error: dashboard.load

AbstractController::ActionNotFound:
  The action 'show' could not be found for DashboardsController
Simple enough, the show action needs to map to a method in the controller:
class DashboardsController < ApplicationController
  def show; end
end
Guess what we need to do next. Yup, run that test.
Failure/Error: dashboard.load

ActionController::MissingExactTemplate:
  DashboardsController#show is missing a template for request formats: text/html
For an action to be displayed in the browser, there needs to be a view template. That’s a fancy way of saying we need to tell Rails what to put on the page. We don’t need to overthink this right now, it’s not important at this point in time.
Templates follow the same resource + action convention (hopefully you’re
noticing a lot of consistency). Given this, you need to create the directory,
app/views/dashboards and then create the file
app/views/dashboards/show.html.erb. We can get into the power of ERB files
another time but just know that the Rails Asset Pipeline processes your files
in multiple stages—one stage per file extension—in reverse order. ERB, or
Embedded RuBy, is a format for adding dynamic content into your files. Once all
the dynamic content has been processed, then the file is rendered as HTML for
delivery to the browser.
While we don’t need anything in the template at the moment, it’ll be valuable for our own visual testing if we see something other than a white screen so simply place the word “Dashboard” into this file.
The next error is:
Failure/Error: expect(sign_in_page).to be_displayed

SitePrism::NoUrlMatcherForPageError:
  SitePrism::NoUrlMatcherForPageError
Just like the dashboard page, we need to tell SitePrism the URL of the sign-in page. But how are we supposed to know what URL Devise assigns? Thankfully, Rails can tell us all the available routes by running:
rails routes
One of the results will be:
new_player_session GET /players/sign_in(.:format) devise/sessions#new
That sounds reasonable; “players” is what we called our model and “sign_in” is
the action we want them to take. Given this, it seems logical that the sign-in
URL will be /players/sign_in.
It could turn out that this is not the correct path. That’s okay; we’re just laying out what we think will happen and, if it’s wrong, we’ll fix it.
Set the fake URL in spec/pages/players/sign_in.rb:
class SignIn < SitePrism::Page
  set_url "/players/sign_in"
end
The next error is:
Failure/Error: expect(sign_in).to be_displayed

SitePrism::NoUrlMatcherForPageError:
  SitePrism::NoUrlMatcherForPageError
This is really the whole point of what we are doing here. We want
unauthenticated players to be sent to the sign-in page but, instead, they are
being sent to the dashboard. What we want to do is tell Rails that all requests
need to be approved by Devise. You can either do this on each of your
controllers or you can add it globally to the ApplicationController. Since we
always want people to be authenticated, modify
app/controllers/application_controller.rb to read:
class ApplicationController < ActionController::Base
  before_action :authenticate_player!
end
If you run Rspec again you’ll see:
1 example, 0 failures
Now let’s make sure the authentication is working and that authenticated players are taken to the dashboard.
We will want to test both what happens when someone logs in successfully and when there is some issue (e.g. incorrect password). We have the most clarity about how the “happy path” will work—a player enters their details and they are taken to the dashboard—so it would be logical to start here.
I always like to map the story first and then worry about the implementation details. We already have a context for “when the player is not authenticated” and signing in seems like it is an extension of that journey. So, what else is going on? Well the player is entering their login credentials so we could say something like “when the player is not authenticated and they enter the correct credentials into the sign-in form, they are taken to the dashboard”. That story looks like this:
context "when the player is not authenticated" do
  it "sends them to the sign-in page" do
    dashboard = Pages::Dashboards::Show.new
    dashboard.load
    expect(dashboard.current_path).to eq(new_player_session_path)
  end

  context "when they enter the correct credentials into the sign-in form" do
    it "takes them to the dashboard" do
    end
  end
end
Now that we know the behaviour we are testing, we can think about how we would test this. We already have an example of how to load a page from the previous test that we can be inspired from:
context "when they enter the correct credentials into the sign-in form" do
  it "takes them to the dashboard" do
    dashboard = Pages::Dashboards::Show.new
    sign_in_page = Pages::Players::SignIn.new

    sign_in_page.load
  end
end
Now we need to fill in and submit the sign-in form:
it "takes them to the dashboard" do
  dashboard = Pages::Dashboards::Show.new
  sign_in_page = Pages::Players::SignIn.new

  sign_in_page.load

  sign_in_page.email_field.set("player@example.com")
  sign_in_page.password_field.set("Passw0rd")
  sign_in_page.login_button.click
end
Remember, a lot of these things haven’t been implemented yet, we’re just writing out how we expect it to work.
Finally, we expect the end result will be that we are on the dashboard:
it "takes them to the dashboard" do
  dashboard = Pages::Dashboards::Show.new
  sign_in_page = Pages::Players::SignIn.new

  sign_in_page.load

  sign_in_page.email_field.set("player@example.com")
  sign_in_page.password_field.set("Passw0rd")
  sign_in_page.login_button.click

  expect(dashboard).to be_displayed
end
Run your test in the expectation of failure.
NoMethodError:
  undefined method `email_field' ...
Okay, we expected this one since we haven’t created the variable “email_field” yet. This needs to be added to the sign-in page class:
class SignIn < SitePrism::Page
  set_url "/players/sign_in"

  element :email_field, "FIXME"
end
Hhhhmmmmm… but what should that variable be set to? It should be a CSS selector that can be used to find the email field. We know that it is going to be an HTML input tag and that input will be of type “email” but it’s possible to have lots of email inputs on a page. We could restrict the search to only an email input in this form but how do we know how to find the form?
If we were testing a form we were building, I would think about Rails naming
conventions but this is a Devise form that already exists so I’m just going to
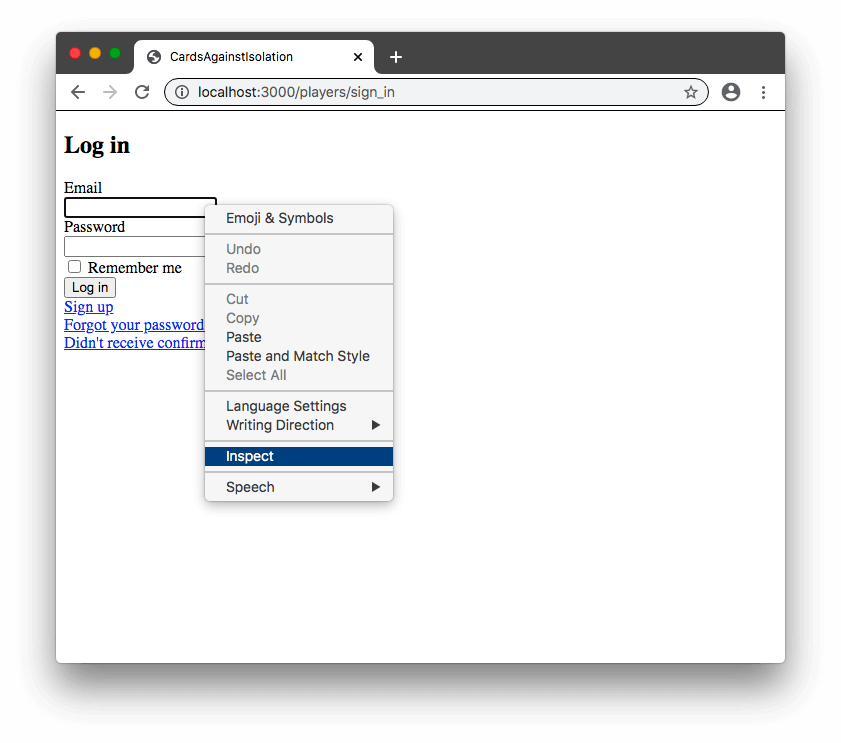
cheat and look at it in the browser. All major browsers have a way for you to
inspect the elements on the page and see their attributes. Since I know you have
Chrome installed, I’m going to use that. The way I like to find the form is to
right-click on the top-most form element (the email field in this case) and then
select “Inspect” from the contextual menu.
 Then I move my way up from the field I selected until I find the form tag.
 Here I can see that the form has an ID of “new_player” so I’m going to use that
to narrow the search.
Here I can see that the form has an ID of “new_player” so I’m going to use that
to narrow the search.
The CSS selector for finding an email input inside the new_player form would be
#new_player input[type=email]
class SignIn < SitePrism::Page
  set_url "/players/sign_in"

  element :email_field, "#new_player input[type=email]"
end
Run the tests:
NoMethodError:
  undefined method `password_field' for ...
So, now we use the same process to add the password field:
element :email_field, "#new_player input[type=email]"
element :password_field, "#new_player input[type=password]"
Now we see:
NoMethodError:
  undefined method `login_button' for ...
Forms are most often submitted with HTML input of type submit so the selector here is just like the input fields:
element :email_field, "#new_player input[type=email]"
element :password_field, "#new_player input[type=password]"
element :login_button, "#new_player input[type=submit]"
The next error is:
Failure/Error: expect(dashboard).to be_displayed
To prove that someone can log in, we need a player in our database so we need to create one before the tests are run:
describe "Player authentication", type: :feature do
  before do
    Player.create!(
      email: "player@example.com",
      password: "Passw0rd"
    )
  end

  context "when the player is not authenticated" do
That before block will be run before every test is performed. If you are new
to testing, you might wonder why we would create the player before every test.
Wouldn’t that lead to duplicate players? It is important that tests can set up
the exact conditions necessary to verify that a particular scenario is accounted
for. To allow for this, the database is cleared between tests. The
spec/rails_helper.rb file that RSpec provided includes:
config.use_transactional_fixtures = true
This setting tells Active Record to run each test inside a database transaction. The database keeps a record of all the changes you make inside a transaction and doesn’t commit them until you give it approval. Instead of giving approval, Active Record tells the database to purge the changes (roll back) and so nothing is ever permanently stored in the database.
Running the tests again provides a curious result:
NameError:
  undefined local variable or method `unconfirmed_email' for #<Player:0x00007faa615cb850>
This is one of those more difficult to understand errors. Since it didn’t make
any sense to me, I simply Googled it. I did remember that there was an
“unconfirmed_email” field in the database migration that Devise provided but it
said “Only if using reconfirmable” and I never asked for anything called
“reconfirmable”. Well, it turns out it is on by default if you opt into
confirmable (nice one Devise!). Reconfirmable requires people to confirm their
email again if they want to change it. We’re only using email confirmation to
help deter spambots so this seems like overkill to me. If you open the Devise
settings at config/initializers/devise.rb you can find the existing option:
config.reconfirmable = true
and disable it:
config.reconfirmable = false
Your commit messages, like your specs, should tell a story and this change doesn’t really fit into the authentication story so we should commit it now:
git add --patch config/initializers/devise.rb
git commit
Disable Devise reconfirmable
When you enable the Devise confirmable module, the default is for reconfirmable to also be enabled. Reconfirmable requires that email addresses be re-confirmed when they are changed.
Confirmable is being used as a form of spambot protection. We should be able to assume that, if someone can confirm their original address, they are either not a robot or they are a robot sufficiently capable of confirming email addresses and so another test is unlikely to trip them up.
Reconfirmable also requires an extra field in the players table that was not generated
When we run our tests again, we get:
Failure/Error: expect(dashboard).to be_displayed
but, that’s weird, didn’t we fix all this issues?
Obviously, we forgot something but how we can tell what that is when we can’t see the page‽ Thankfully, Capybara has a solution for this. By making the following change:
  sign_in_page.login_button.click

  save_and_open_page

  expect(dashboard).to be_displayed
end
Capybara will save the state of the page at that point in time. By default, you need to open this file yourself but, if you install the launchy gem, they will be automatically opened in your browser for you. Add launchy to your test group in Gemfile:
group :test do
  gem "cuprite", "~> 0.11.0"
  gem "launchy", "~> 2.5.0"
  gem "site_prism", "~> 3.7.0"
end
Then install and commit since it’s outside of our current story:
bundle
git add Gemfile Gemfile.lock
git commit
Add launchy gem
Launchy is used by Capybara to automatically open debugging files in the browser
Now you can run your tests again and we’ll see what’s going wrong.
Of course, we are using the confirmable module of Devise and we haven’t
confirmed our test player. Usually a player would confirm by clicking a link in
an email, though, so how does that work in tests? Thankfully, Devise adds a
confirm method to players so we can change our test file to read:
before do
  Player.create!(
    email: "player@example.com",
    password: "Passw0rd"
  ).confirm
end
and now our test passes. Just remember to remove the save_and_open_page.
Before we finish up, we should test the “unhappy paths”. The first candidate should surely be the path that tripped us up, an unconfirmed player.
context "when the player is not authenticated" do
...
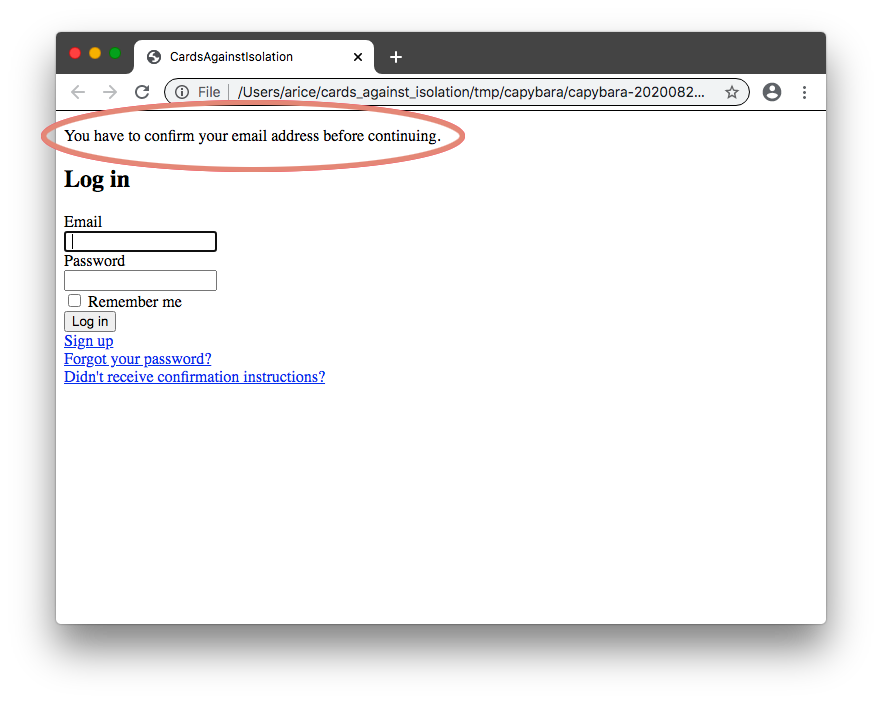
context "when they have not confirmed their account" do
it "shows an error message" do
sign_in_page = Pages::Players::SignIn.new
sign_in_page.load
sign_in_page.email_field.set("player@example.com")
sign_in_page.password_field.set("Passw0rd")
sign_in_page.login_button.click
expect(sign_in_page.alert).to have_content(
"You have to confirm your email address before continuing."
)
end
end
end
This is mostly the same as our previous test except for that expectation:
expect(sign_in_page.alert).to have_content(
  "You have to confirm your email address before continuing."
)
What we are saying is that the page will have an element called “alert” which
we will map to the flash message we created way back when we installed Devise.
For that to work, however, we are going to need to create the element on the
page class, spec/pages/players/sign_in.rb:
element :email_field, "#new_player input[type=email]"
element :password_field, "#new_player input[type=password]"
element :login_button, "#new_player input[type=submit]"

element :alert, ".alert"
When we run the tests, however, we get:
Unable to find css ".alert"
If you were to add save_and_open_page before the expectation, you’ll see that
the page is logged in. This is because we are confirming the player when we
create it. We need some way to decide when to confirm the player. For this we
can use let blocks which are a way to create variables in RSpec. First, let’s
move the player creation into a let.
Change:
before do
  Player.create!(
    email: "player@example.com",
    password: "Passw0rd"
  ).confirm
end
To:
let(:confirmed_player) do
  Player.create!(
    email: "player@example.com",
    password: "Passw0rd"
  ).confirm
end
Run your test suite—you should have an error for “when they enter the correct
credentials into the sign-in form takes them to the dashboard”. This is because
the let variables are only created when you explicitly call them. This means
that the confirmed player doesn’t exist in that test yet, so let’s add it:
context "when they enter the correct credentials into the sign-in form" do
  it "takes them to the dashboard" do
    confirmed_player
    dashboard = Pages::Dashboards::Show.new
    sign_in_page = Pages::Players::SignIn.new

    sign_in_page.load

    sign_in_page.email_field.set("player@example.com")
    sign_in_page.password_field.set("Passw0rd")
    sign_in_page.login_button.click

    expect(dashboard).to be_displayed
  end
end
Run your tests again and make sure that now only your new test is failing.
Now that we have a confirmed player we need an unconfirmed player:
let(:unconfirmed_player) do
  Player.create!(
    email: "player@example.com",
    password: "Passw0rd"
  )
end

let(:confirmed_player) do
  unconfirmed_player.confirm
  unconfirmed_player
end
Make sure the tests that were passing still pass and then you should be left with:
expected to find text "You have to confirm your email address before continuing." in "Invalid Email or password."
To correct this, we need to create the unconfirmed player:
context "when they have not confirmed their account" do
  it "shows an error message" do
    unconfirmed_player
    sign_in_page = Pages::Players::SignIn.new

    sign_in_page.load

    sign_in_page.email_field.set("player@example.com")
    sign_in_page.password_field.set("Passw0rd")
    sign_in_page.login_button.click

    expect(sign_in_page.alert).to have_content(
      "You have to confirm your email address before continuing."
    )
  end
end
This should give you all green tests. The final tests will be for when the user is confirmed but the email or password is wrong. With everything that has been set up now, these are going to be easy:
context "when they enter an incorrect email address" do
  it "shows an error message" do
    confirmed_player
    sign_in_page = Pages::Players::SignIn.new

    sign_in_page.load

    sign_in_page.email_field.set("invalid@example.com")
    sign_in_page.password_field.set("Passw0rd")
    sign_in_page.login_button.click

    expect(sign_in_page.alert).to have_content("Invalid Email or password.")
  end
end

context "when they enter an incorrect password" do
  it "shows an error message" do
    confirmed_player
    sign_in_page = Pages::Players::SignIn.new

    sign_in_page.load

    sign_in_page.email_field.set("player@example.com")
    sign_in_page.password_field.set("invalid")
    sign_in_page.login_button.click

    expect(sign_in_page.alert).to have_content("Invalid Email or password.")
  end
end
You should now have 5 green tests and so we can refactor. Our approach was to write tests that document our expectation of what the behaviour would be before verifying that behaviour. Normally, you would be documenting your expectations and then writing code to fulfil those expectations. You can’t always know how every tiny detail will play out, however, and so you should take the time to consider whether adjustments are necessary.
We found the elements in our form using generic CSS selectors. For instance,
the email address field, while restricted to the new_player form, is just
any input that is of type “email”. Now that our tests are passing, we can take
a look at the elements on the page and see if there is a better way.
It turns out that Devise is using Rails naming conventions, which shouldn’t really come as a surprise.
The convention for naming form inputs is model[attribute]. So the email
attribute on a player is named player[email]. We can modify
Pages::Players::SignIn to use this convention like:
element :email_field, "#new_player input[name='player[email]']"
element :password_field, "#new_player input[name='player[password]']"
Now the “email_field” selector reads “get an input with the name ‘player[email]’ inside an element with the ID ’new_player’”.
Make sure you still have 5 green tests and then you’re done. Time to commit:
rspec
rubocop
git add --intent-to-add app spec
git add --patch
git commit
Direct unauthenticated players to sign in
You should also push your code to the cloud:
git push
Wrapping up#
Wow, that was a lot but what you’ve got is a foundation for everything that is yet to come.
The most important take-away should be that test-driven approach. There is an enormous amount to know and remember when building a web app. The best thing you can do is stop, write down what you are trying to achieve, and then tackle it in really small pieces. Building something huge can be terribly overwhelming but building lots of tiny things can feel totally achievable.
If you’ve had any issues or there is anything you want to check, you can review my repository as it looked after this commit.
In the next post, we finish testing Devise.